

Caching
Digital Marketing Tip – Implement Fragment Caching
Fragment caching works by identifying sections of code, which take up time and resources, and caching just those sections.
As far as performance goes, WordPress is brilliant for a smaller website, right out of the box. Your front-end pages load very quickly, data is retrieved from the database and saved to it very fast on the back-end.
But, when you try to add loads of content, with loads of metadata for every post, then you will start to see things slow down, considerably. This is quite common and there are plenty of ways to sort the problem out.
Use a Caching Plugin
Caching plugins are the most used tools on WordPress websites, a way of speeding things up and there are plenty to choose from.
Each plugin has its own approach but, overall, the bit that slows everything down, i.e. a page that needs to load, is placed in a temporary location for storage.
That way, when the page is requested again, it can be retrieved much quicker because the stored page is called on instead of the front-end page having to be loaded each time.
However, once this storage reaches an age which is determined beforehand it will be removed and then recached to make sure users don’t get old data.
Some of the best plugins for this are:
- W3 Total Cache
- W3 Super Cache
- WP Fastest Cache
Because each has its own method of doing things, each plugin has its own set of pros and cons. Overall, the popular solutions have one common problem – they cannot cache data for a logged in user.
This might seem to be something of an oversight; after all, why cache data if your editors or your users won’t see the benefit? It might interest you to know that this has been left out intentionally and for a very good reason.
Imagine that your website has exclusive content that is only for subscribers who pay for it. If you cache the data for this content, there is a good chance that you could serve it to users who do not pay for it which allows anyone to get your content without subscribing.
So, does this mean that a website driven by membership cannot take advantage of caching? Of course, they can.
This is where fragment caching comes in.
What is Fragment Caching?
In the scenario above, we cannot cache all the content on a whole page load, but we can still use caching. Fragment caching works by identifying sections of code, which take up time and resources, and caching just those sections.
This means your unpaid subscribers don’t get to see the content reserved for those who pay.
How much time you can save will depend on how many fragments are cached but, where you have a large and complex website, the time savings will soon add up.
How do we implement fragment caching? Very easily, thanks to something called the Transients API. This is a storage method for temporary data that has an arbitrary timeframe.
Have a look at this example:
// Get an existing copy of transient data, if there is one
if ( false === ( $foo = get_transient( ‘foo_transient’ ) ) ) {
// Nothing was found or the transient has expired; regenerate it!
$foo = someExpensiveCodeOrQuery();
set_transient( ‘foo_transient’, $foo, 2*HOUR_IN_SECONDS );
}
// Use $foo somehow
On the second line, we have called a method called get_transient and this will try to pull up the cached value for foo_transient. If there is a transient and it is still in date, the cached value is returned and the code will then move to the seventh line.
If no value is found, a value of false is returned and the third, fourth and fifth lines will then be executed. The result is $foo being saved under the name of foo_transient and an expiration time of two hours is added.
Fragment caching is not a method to fix everything but it can be an incredibly useful tool for reducing page loading by seconds and, as we all know where page loading times are concerned, every second counts.
Combine fragment caching with other methods of speeding up WordPress for significant gains in speed.


Caching
Digital Marketing Tip – Leverage Browser Caching Using Expires Headers
Leveraging browser caching on your WordPress website can offer up some significant speed savings

Leveraging browser caching on your WordPress website can offer up some significant savings as far as page loading goes.
First, a web browser must retrieve a whole heap of resources off a server, so it can load a website and web caching is used to store website pages for faster loading next time they are called.
How to Leverage Browser Caching
To leverage browser caching, your web server must allow the browser to store the visited pages on a local disk, temporarily. So how do we enable this?
By setting dates for content expiry and we do this by adding etag headers and cache control headers in your HTTP headers. Cache control is basically for dictating how long a file is cached by a web browser and etag verifies any changes between the cached resource and what is requested.
Using Apache Server
With Apache server you must make an edit to the .htaccess file. Find your .htaccess file and add the following code to the file and save it:
# TN – START EXPIRES CACHING #
ExpiresActive On
ExpiresByType text/css “access 1 month”
ExpiresByType text/html “access 1 month”
ExpiresByType image/gif “access 1 year”
ExpiresByType image/png “access 1 year”
ExpiresByType image/jpg “access 1 year”
ExpiresByType image/jpeg “access 1 year”
ExpiresByType image/x-icon “access 1 year”
ExpiresByType application/pdf “access 1 month”
ExpiresByType application/javascript “access 1 month”
ExpiresByType text/x-javascript “access 1 month”
ExpiresByType application/x-shockwave-flash “access 1 month”
ExpiresDefault “access 1 month”
# TN – END EXPIRES CACHING #
Try to set your dates for one year – under a month and over a year is not really recommended. Once you have done that, add the cache control header as follows, to the .htaccess file:
TN – BEGIN Cache-Control Headers
<filesMatch “\.(ico|jpe?g|png|gif|swf)$”>
Header set Cache-Control “public”
<filesMatch “\.(css)$”>
Header set Cache-Control “public”
<filesMatch “\.(js)$”>
Header set Cache-Control “private”
<filesMatch “\.(x?html?|php)$”>
Header set Cache-Control “private, must-revalidate”
# TN – END Cache-Control Headers
It isn’t necessary to specify a timeline in this because you already did that for the cached resources. The last thing to do is turn off etags by adding this code:
# TN – BEGIN Turn ETags Off
FileETag None
# TN – END Turn ETags Off
Now save the file and, if you are using a cache plugin, clear the cache.
Using Nginx Server:
On the Nginx server, you need to edit your .conf file which you will find in
/etc/nginx/sites-enabled/default
Go to the file and add this code:
location ~* \.(jpg|jpeg|png|gif|ico|css|js)$ {
expires 365d;
}
location ~* \.(pdf|html|swf)$ {
expires 90d;
}
Next, add the cache control header:
location ~* \.(jpg|jpeg|png|gif|ico|css|js)$ {
expires 90d;
add_header Cache-Control “public, no-transform”;
}
Using a Plugin
If you prefer to use a plugin, you can choose one of these three highly reliable and recommended plugins:
WP Fastest Cache
One of the top plugins, used on more than 300,000 WordPress websites. WP Fastest Cache also offers other features for optimizing page speed, such as :
- Minification
- Gzip compression
- Reducing HTTP requests
- Generation of static files
Browser Caching with .htaccess
Another popular plugin, this is lightweight and does exactly what it says. It doesn’t have too many settings making it ideal for the beginner, but it does allow you to modify the time span for Expires header.
W3 Total Cache
Finally, w3 Total Cache offers a straightforward way to leverage browser caching with a light, easy to use plugin, ideal for beginners.
It doesn’t matter if you choose the plugin route or the editing route; what matters is that you leverage browser caching to speed up your WordPress website.
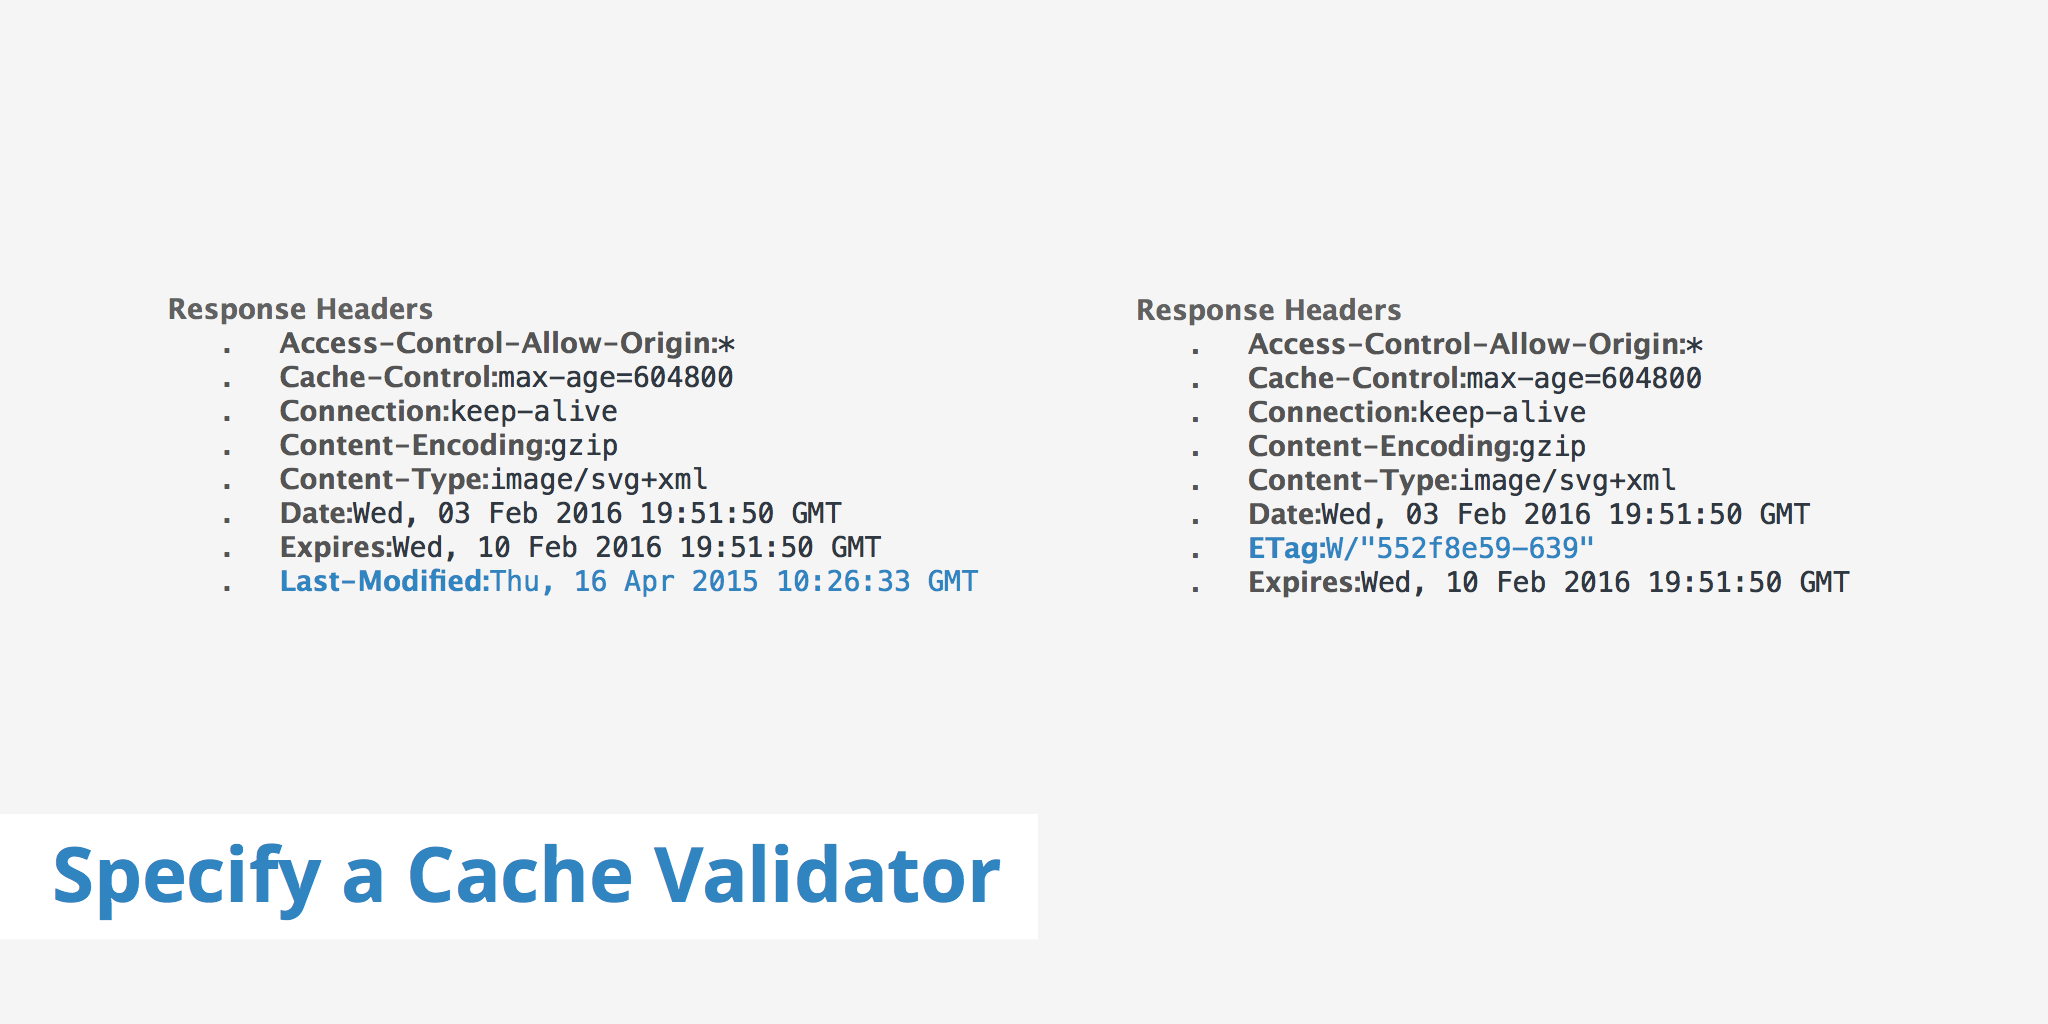
Cache validators are defined inside response headers and HTTP requests and are used to determine if whether or not a request to retrieve files from the browser cache are valid.
These validators are important because they work out whether a request needs to be sent to the server, which uses more resources and takes longer, or if the required files can be got from the local cache, thus increasing loading speed and using less resources.
It is always going to be better to retrieve files from the browser cache because it doesn’t involve the round trips that requests to the server involve. Using a cache validator, like an etag header or Last-Modified, can help to ensure that the browser is using caching as efficiently as possible.
How to Specify a Cache Validator
When you use a we serve, such as Nginx or Apache, the Last-Modified header is included by default. When your page speed tool, like GTMetrix or Google Page Speed, come up with the suggestion that you specify a cache validator, you are required to use either Last-Modified header, Etag and Expires Header or Cache Control Max Age header.
Last Modified and Etag headers are used for assisting the browser to work out if the requested file has been altered in any way since it was requested last. Cache Control and Expires header are used for working out how long a file should be stored in the cache before a new copy is requested from the server.
If you don’t use the Expires or Cache control headers, the browser has no way of knowing how long a local cached copy should be stored before a new one is retrieved. These may already have been defined on the server you use but, if you need to define them manually and you use Nginx or Apache, you can use these code snippets:
Apache
<filesMatch “.(ico|pdf|flv|jpg|jpeg|png|gif|js|css|swf)$”>
Header set Cache-Control “max-age=84600, public”
Nginx
location ~* \.(js|css|png|jpg|jpeg|gif|ico)$ {
expires 2d;
add_header Cache-Control “public, no-transform”;
}
If you wanted to add the Last Modified header straight into a dynamic file, you would need to use the gmstrftime from the PHP file, as in the next example:
header(‘Last-Modified: ‘ . gmdate(‘D, d M Y H:i:s’) . ‘ GMT’);
On occasion, you may be trying to load resources stored on another domain. In this case, your speed test tools would send you a notice that you are required to specify a cache validator for those resources.
You could ignore this notice in safety – just like assets that are loaded from fonts.googleapis.com, for example, you do not have control over setting any cache validator for the resources and there is always a chance that what was specified has been intentionally removed.
Browser caching is a very important factor in WordPress website speed and making sure that you specify the right cache validator, and that it works as it should do, is critical for ensuring that browser caching is being used efficiently and results in speedier page loading.
WordPress is, by default, a dynamic content management system and this means that it must look for every page a visitor requests in the database just to see if it exists.
In most cases, especially where a website doesn’t get too much traffic, this isn’t a problem but, should there be a surge in traffic, your WordPress site will suddenly start using enormous amounts of CPU resources while trying to deal with duplicated requests, over and over.
Stopping this is quite easy to do by using the right caching plugin.
A caching plugin caches the first request from a visitor for a page on the server, in plain HTML so that when that page is requested again, by another visitor, that cached version is served – so long as the page hasn’t been updated in admin or with a comment in the meantime.
This reduces that amount of CPU usage significantly.
Let’s say that you have 50 separate views of your main page and it hasn’t been cached. That would mean 50 queries on the database, each time it just goes back to the same data.
By using a caching plugin, only the first request would be queried on the database and the next 49 would get the cached version immediately, no having to wait for the query to complete.
This is a win-win – you get a reduction in resources used and your visitors get a quicker loading time.
W3 Total Cache
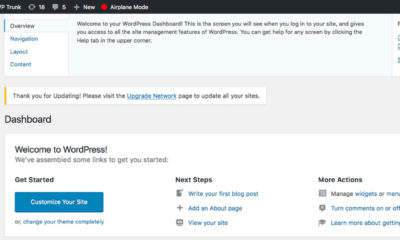
One of the easiest caching plugins to use in WordPress is W3 Total Cache and I’m going to show you how to use it.
- In your WordPress dashboard, hover your mouse over Plugins and choose Add New
- Type W3 Total Cache in the search box
- Click Search Plugins and then click Install Now under W3 Total Cache
- A window will pop up, click OK
- Now click on Activate Plugin and you will see a message telling you the plugin has been activated
- Go to the menu on the left-hand side and you should see a section called Performance – hover the mouse over it and click General Settings
- Scroll down the page and make sure that each of the main parts has been enabled.
Those parts are:
- Page Cache
- Minify*
- Database Cache
- Object Cache
- Browser cache – click Save All Settings once you enable this one
* If you use Minify, enable the option and save it. Straightaway, go straight to your website and make sure it all looks good.
If there are any formatting issues, a plugin or theme may be incompatible with minification. If this is the case, you will either need to change the theme or plugin or disable minification
Now make sure that the following have been check marked and click Save All Settings:
- Cache home page
- Cache 404 pages
- Cache feeds
- Cache requests only
- Don’t cache pages for logged-in users
Lastly, ensure that everything has been correctly set up and then go to your website. Open your site, click on View and then Page Source so that you can see the page source.
Scroll down, right to the bottom and you should see a banner for W3 Total Cache. This will tell you that the plugin has optimized your page
When you have confirmed it all and your website is running perfectly, you are done. W3 Total Cache will ensure that your pages load faster, and fewer server resources are used, resulting in happier visitors and fewer bounces.

13 Steps To Building A Profitable High Traffic Technology Blog – Part five – WordPress Hosting
13 Steps To Building A Profitable High Traffic Technology Blog – Part Four – your logo

Who approved never get Hulu as an ad slogan?

13 Steps To Building A Profitable High Traffic Technology Blog – Part Three – the baby business plan

A Failure of imagination – Apple release new iPhone XR iPhone XS and iPhone XS Max
-

 Website Performance8 years ago
Website Optimization Tips – Optimizing the Order of Styles and Scripts
-

 Web Content9 years ago
How to test a copywriter
-

 Website Performance8 years ago
WordPress Performance Tips – Enable Keep Alive
-

 Research and SEO12 years ago
New Google Penguin Algorithm Update Being Rolled Out
-
 Digital Marketing Training8 years ago
13 Steps To Building A Profitable High Traffic Technology Blog – Part five – WordPress Hosting
-

 Digital Marketing Training8 years ago
13 Steps To Building A Profitable High Traffic Technology Blog – Part Four – your logo
-

 Web Content12 years ago
7 Basic Principles Of Good Writing
-
 Digital Marketing Training8 years ago
13 Steps To Building A Profitable High Traffic Technology Blog – Part Three – the baby business plan