
Optimizing Scripts
Speed Up WordPress without a Plugin
There are so many ways to speed up your WordPress site but many of them involve installing this plugin or that one, having to set it all up and hoping that it doesn’t cause a conflict somewhere else down the line.
But did you know that you can optimize WordPress to a certain extent without having to install a plugin? I wouldn’t recommend this for beginners because it involves editing the .htaccess file, wp-config and php.ini file.
Here goes.
Step 1 – Back up your website
Before you make any changes to any file or install any plugin, you should always back your website up. If things go wrong and you haven’t done this, you stand a good chance of losing the lot.
Step 2 – Use Google PageSpeed Insights to See Your Current Page Speed Score
Self-explanatory, do write down the pertinent information form this so you can compare it later
Step 3 – Open .htaccess
You will need an FTP client to do this as the file is in your website’s root directory. You need to enable browser caching and once you have done that, save it and then check the front-end of your website to make sure it all still works.
What we are doing is enabling Expire Headers so insert the following code into the file:
[code]
# BEGIN Expire headers
ExpiresActive On
ExpiresDefault “access plus 5 seconds”
ExpiresByType image/x-icon “access plus 2592000 seconds”
ExpiresByType image/jpeg “access plus 2592000 seconds”
ExpiresByType image/png “access plus 2592000 seconds”
ExpiresByType image/gif “access plus 2592000 seconds”
ExpiresByType application/x-shockwave-flash “access plus 2592000 seconds”
ExpiresByType text/css “access plus 604800 seconds”
ExpiresByType text/javascript “access plus 216000 seconds”
ExpiresByType application/javascript “access plus 216000 seconds”
ExpiresByType application/x-javascript “access plus 216000 seconds”
ExpiresByType text/html “access plus 600 seconds”
ExpiresByType application/xhtml+xml “access plus 600 seconds”
# END Expire headers
# BEGIN Cache-Control Headers
Header set Cache-Control “public”
Header set Cache-Control “public”
Header set Cache-Control “private”
Header set Cache-Control “private, must-revalidate”
# END Cache-Control Headers
[/code]
Step 4 – Limit the Number of Post Revisions
WordPress, by default, stores every change made to your posts and pages and having too many of these can cause a serious slow-down in your website. In the root directory of your WordPress installation, find the wp-config.php file and add this code:
[code]
/**Limit Post Revisions**/
define( ‘WP_POST_REVISIONS’, 3);
[/code]
Or, you could set your site so it stores no post revisions, in which case, your code would be:
define( ‘WP_POST_REVISIONS’, false);
Step 5 – Find Your PHP.INI file
The location of this will depend on your host so have a look in the host control panel for something like CGI PHP Scripts or just ask your host where it is. When you have it, you are going to enable GZip with the following code.
First, find this line in the file:
[code]
zlib.output_compression = Off
[/code]
Change Off to On
Now look for this line:
[code]
zlib.output_compression_level = 6
[/code]
Most likely your level number will be different so set it to 6. Save and check your website front-end – you should already be seeing a significant increase in speed.
Step 6 – Retest on PageSpeed Insights
How does your new score compare to the old one?
Seriously, you can spend days, weeks trying to speed up your website with all sorts of tools and, in all honesty you should do it. But for now, to see an immediate increase, these steps will work, speeding up your WordPress website quite considerably, inside of about 10 minutes and with no plugins in site.
Optimizing Scripts
WordPress Performance Tip: Implement Full Page Caching
Every week a new caching plugin gets released but before you jump on each one to try it out, you need to understand how caching works, especially as it is multi-level.

Every week a new caching plugin gets released but before you jump on each one to try it out, you need to understand how caching works, especially as it is multi-level.
Whenever a request is sent by a user to a specific page, the reply doesn’t come straight from the website. Instead, if the data is fresh, it must be prepared from scratch and that takes time.
By the time it actually arrives with the user, the chances are they’ve gotten fed up and gone to another website.
Full Page Caching
Full page caching is done at different levels:
- Network level
- Server level
- Application level
Network Level
Two excellent examples of full page caching at network level are Cloudflare and Fastly. Both of these implement full page caching before a request even gets to the server where your website lives.
This is down to point of presence being used in multiple locations so that, when a user requests a page, the request goes via Cloudflare or Fastly, to the server.
The Point of Presence (PoP) caches the response for a predetermined time. For example, if the server sends an s-maxage cache header of 24 hours, any subsequent request for that page will be served by the PoP server for a period of 24 hours, and not the origin server.
Server Level
This type of full page caching is done by the web server or the origin server. For example, Apache uses Traffic Server, while Nginx uses fastcgi caching and proxy cache.
Application Level
There is no trickery here, its all done by WordPress caching engines and these are the most popular:
- WP Super Cache – the most popular caching engine with a few add-ons, like the integration of CDN.
- W3 Total Cache – another very popular one, with CDN integration and tends to be installed by default on many web hosts
- Batcache – a plugin that doesn’t get used as much as it should, this one does just what it says – caching. Nothing more, nothing less. There is no CDN integration, no preloading of cache, no tricks. Just pure and simple full page caching. There is a catch though; there is no file-based caching. Most plugins that offer caching generally create files that have got the cached page version in them so that when the request is made, the file is served. Batcache will create an entire full page cache and store it in WP Object Cache.
These are the best solutions available for full page caching on your WordPress website. It really doesn’t matter which one you choose, it will have the result of speeding up your page loading times and server response time.
If you choose one of the caching plugins, simply go to your WordPress dashboard and download it from there. None of them require any special configuration because they are simple plugins that do what they say on the box.
Full page caching is one of the first optimizations you should make for speeding up your website because it seriously affects the front-end experience.
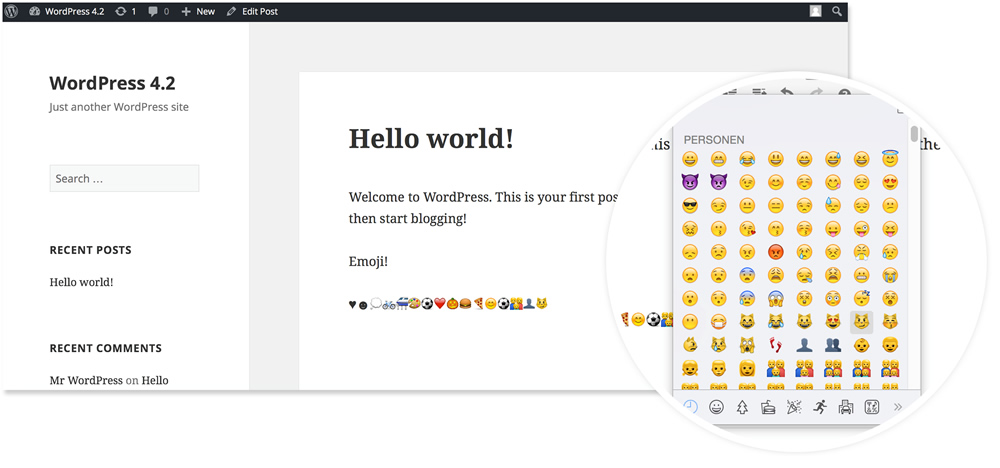
To make your WordPress website load faster and perform better, there are plenty of tweaks that you can do. One of the easiest is to stop emojis from loading on your website.
These are used for expression emotions or ideas and, while they may be good fun, you need to consider if they are necessary. They do add to the page load time which, if they are not necessary, is not good news.
Why? Because they add another HTTP request to load a file called wp-emoji-release.min.js and that request will load on all individual pages of your site.
Disabling Emojis
You can do this in a couple of ways, using code or using a plugin.
Using a Plugin
If you choose to do it this way you can use a free plugin by the name of Disable Emojis. It is a lightweight plugin, so it won’t have too much effect and it removes the additional JS file for supporting Emojis in older browsers. Download it in the same way as you would any other WordPress plugin.
You could also use another free plugin called Emoji Settings or a premium plugin called perfmatters.
Using Code
If installing another plugin on your WordPress site doesn’t appeal to you, you can down the code route. All you need to do is edit the functions.PHP file of your theme with the following code.
NOTE – not to be done if you are not experienced. Making edits to source code can seriously mess up your website if you do it wrong!
Here’s the code:
/**
* Disable the emoji’s
*/
function disable_emojis() {
remove_action( ‘wp_head’, ‘print_emoji_detection_script’, 7 );
remove_action( ‘admin_print_scripts’, ‘print_emoji_detection_script’ );
remove_action( ‘wp_print_styles’, ‘print_emoji_styles’ );
remove_action( ‘admin_print_styles’, ‘print_emoji_styles’ );
remove_filter( ‘the_content_feed’, ‘wp_staticize_emoji’ );
remove_filter( ‘comment_text_rss’, ‘wp_staticize_emoji’ );
remove_filter( ‘wp_mail’, ‘wp_staticize_emoji_for_email’ );
add_filter( ‘tiny_mce_plugins’, ‘disable_emojis_tinymce’ );
add_filter( ‘wp_resource_hints’, ‘disable_emojis_remove_dns_prefetch’, 10, 2 );
}
add_action( ‘init’, ‘disable_emojis’ );
/**
* Filter function used to remove the tinymce emoji plugin.
*
* @param array $plugins
* @return array Difference betwen the two arrays
*/
function disable_emojis_tinymce( $plugins ) {
if ( is_array( $plugins ) ) {
return array_diff( $plugins, array( ‘wpemoji’ ) );
} else {
return array();
}
}
/**
* Remove emoji CDN hostname from DNS prefetching hints.
*
* @param array $urls URLs to print for resource hints.
* @param string $relation_type The relation type the URLs are printed for.
* @return array Difference betwen the two arrays.
*/
function disable_emojis_remove_dns_prefetch( $urls, $relation_type ) {
if ( ‘dns-prefetch’ == $relation_type ) {
/** This filter is documented in wp-includes/formatting.php */
$emoji_svg_url = apply_filters( ’emoji_svg_url’, ‘https://s.w.org/images/core/emoji/2/svg/’ );
$urls = array_diff( $urls, array( $emoji_svg_url ) );
}
return $urls;
}
It’s a bit long but it will do the job and you should find your website pages load significantly faster now.
Again, I must stress, if you are not comfortable with editing code, either go down the plugin route or let a developer do the job for you.
And don’t forget to back up your website before you do anything, just in case it does all go wrong.
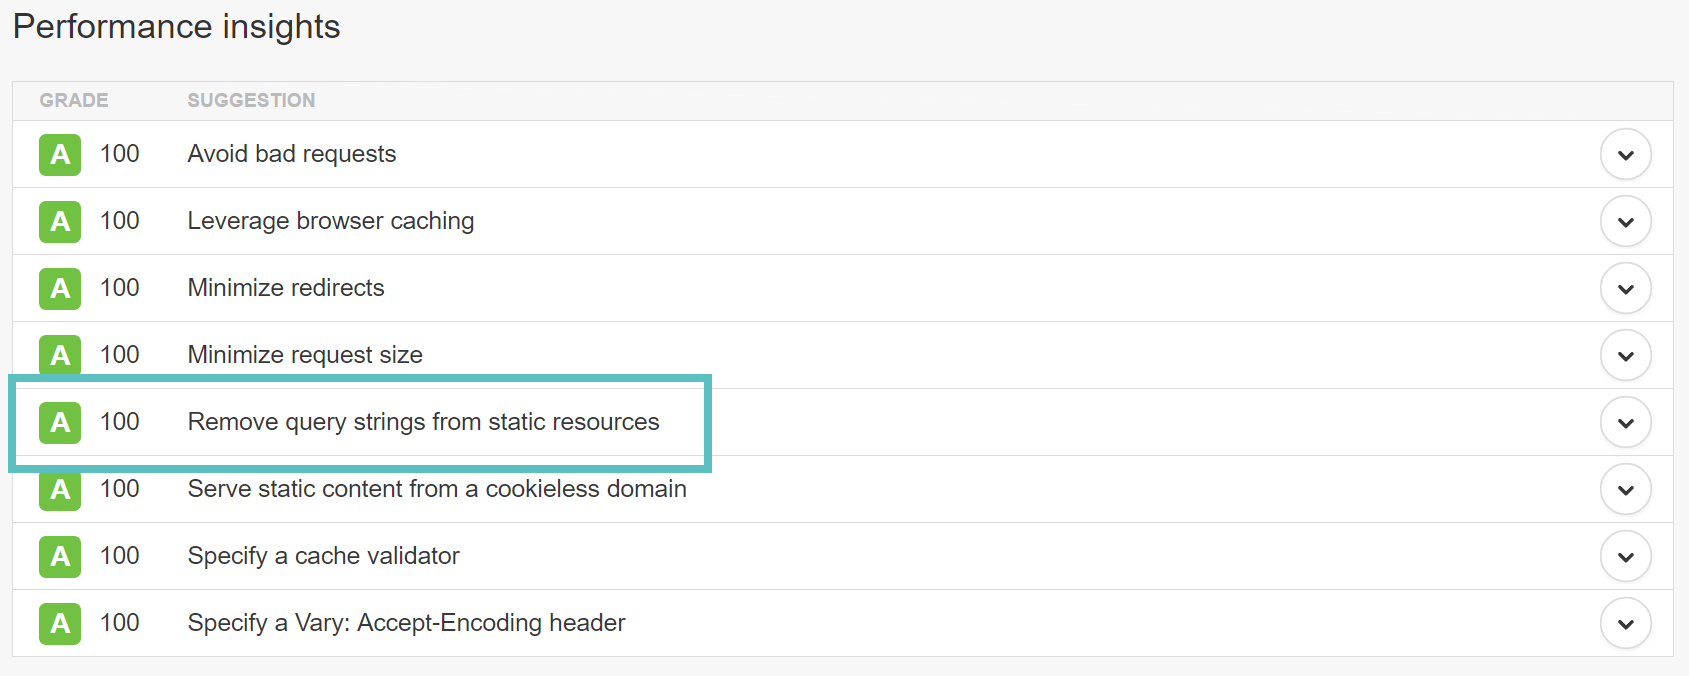
When it comes to improving WordPress performance and speed, one of the more commonly asked questions by more experienced users is, can query strings be removed from static resources?
The answer to that is yes, they can. Usually, the JS and CSS files for your WordPress website will contain the version of the file at the end of the URL, for example, ‘domain.com/style.css? ver=4.5’.
Some servers can’t cache a query string even if the header, cache-control: public is there and this means that getting rid of these strings can provide some small measure of improvement to caching which, in turn, speeds up your website a little.
If you use GTMetrix or Pingdom, sometimes you will see a warning pop up that tells you to remove these strings, so that’s what we are going to do here.
WordPress developers often use file versioning as well so that, when you get around to updating your plugins, you won’t need to flush out the cache.
For example, if a developer releases an update that changes style.css? ver=4.5’ to ver=4.6, it gets seen as a brand-new URL and, as a result, does not get cached.
Removing a Query String from a Static Resource
You can do this in a couple of ways, one way with a plugin and the other using code. If you make use of a CDN for delivering your content, you might not need to do this; some CDN providers already include query string caching as part of their service.
Do check with your provider and with your host before you do any of the following, to see if they already do it for you or can help you do it.
Using a Plugin
Using a plugin is by far the easiest way to remove query strings and the best is called Query Strings Remover. It is an incredibly popular plugin and it will take out all query strings, including “&” and “?” from your URLs in any of your CSS, JS and other static resources.
Download it from WordPress, the same way as you do any other plugin, install it and away you go. You don’t even need to configure it. DO clear your cache after you have installed it though, to make sure you can see the changes.
Alternatively, you could use another popular WordPress plugin called Remove Query Strings from Static Resources, which works the same way as the previous one. Do make sure you only run one of these plugins at a time.
Using Code
Not everyone wants to add another plugin to their WordPress website; after all, too many of these don’t do your website performance any favors either.
In that case, if you are happy and experienced enough to change the functions.PHP file for your WordPress theme then you can do it with code.
A word of warning here; do not attempt this if you have never done this before or are not comfortable; doing it wrong could break your website!
Locate the fucntions.PHP file in your WordPress theme and add this code:
‘function _remove_script_version( $src ){
$parts = explode( ‘?’, $src );
return $parts[0];
}
add_filter( ‘script_loader_src’, ‘_remove_script_version’, 15, 1 );
add_filter( ‘style_loader_src’, ‘_remove_script_version’, 15, 1 );’
If you do it right and you don’t break your website, you won’t get that warning in Pingdom or GTMetrix and your website should be that little bit faster.

13 Steps To Building A Profitable High Traffic Technology Blog – Part five – WordPress Hosting
13 Steps To Building A Profitable High Traffic Technology Blog – Part Four – your logo

Who approved never get Hulu as an ad slogan?

13 Steps To Building A Profitable High Traffic Technology Blog – Part Three – the baby business plan

A Failure of imagination – Apple release new iPhone XR iPhone XS and iPhone XS Max
-

 Website Performance8 years ago
Website Optimization Tips – Optimizing the Order of Styles and Scripts
-

 Web Content9 years ago
How to test a copywriter
-

 Website Performance8 years ago
WordPress Performance Tips – Enable Keep Alive
-

 Research and SEO12 years ago
New Google Penguin Algorithm Update Being Rolled Out
-
 Digital Marketing Training8 years ago
13 Steps To Building A Profitable High Traffic Technology Blog – Part five – WordPress Hosting
-

 Digital Marketing Training8 years ago
13 Steps To Building A Profitable High Traffic Technology Blog – Part Four – your logo
-

 Web Content12 years ago
7 Basic Principles Of Good Writing
-
 Digital Marketing Training8 years ago
13 Steps To Building A Profitable High Traffic Technology Blog – Part Three – the baby business plan
1 Comment